Open Other User's Folders
Access to Outlook mailboxes for administrative assistants
For an updated version of this topic published by Microsoft, which focuses on Outlook Web App, see Open and use a shared mailbox in Outlook Web App.
Outlook makes it easy to give someone limited access to your calendar, task list, inbox or other mailbox folder. The owner of the mailbox has full control through Outlook’s Delegates feature, and folder permissions.
You don’t need to contact Webville to change these permissions. You can do this at any time for any reason. Your changes take effect immediately.
There are two different ways to grant access to your mailbox folders. The recommended solution is to use the Delegates feature, which is designed specifically for administrative assistants. Alternatively, you can manipulate folder permissions directly.
This document will provide instructions for both methods, discuss the pros and cons of each approach, and discuss the Send As method for sending messages under another person's name.
Outlook has a feature that speeds up access to shared folders. Configure Outlook's Advanced Account Settings to download and cache the contents of shared folders as shown in the screen shot.
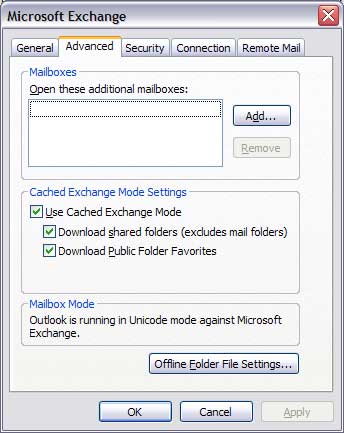
If you do not check the box to download shared folders, every time you click on the shared folder, its entire contents will have to be pulled from the server, through the Internet, to your machine. That, of course, is a slow process.
Delegates Feature Method
Step 1. From the mailbox owner’s workstation, start Outlook, go to the Tools menu, choose Options, and click the Delegates tab. The following dialog will appear.
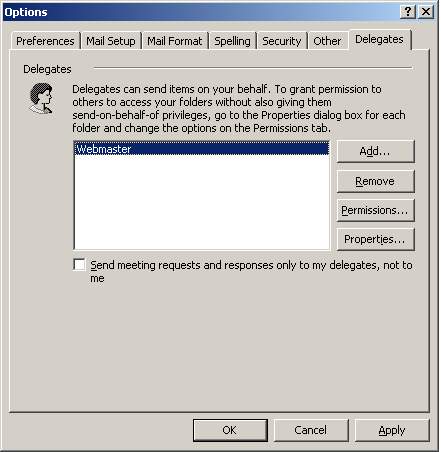
Step 2. On the Delegates tab in Outlook, you can see all your delegates listed, and easily verify the level of access each delegate has to each of your folders. Click the Add button to add a Delegate.
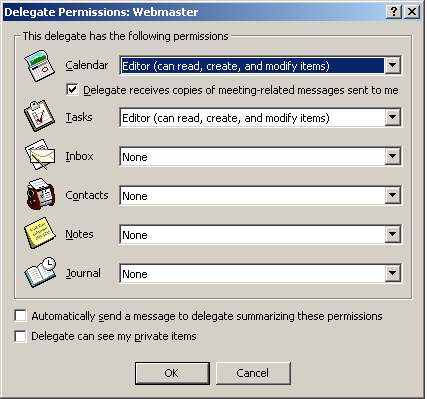
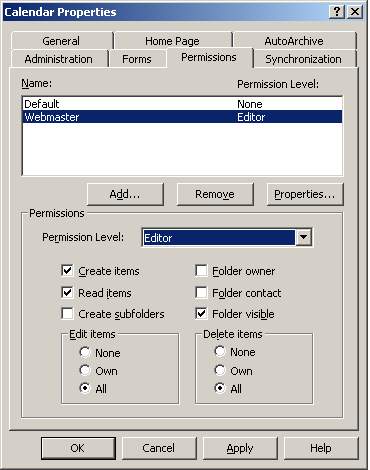
You can give your delegates various levels of access to your calendar, and other folders. The three basic levels are reviewer (can read items), author (can read and create items), and editor (can read, create and modify items). You control the permissions separately for each delegate of course, and you can also control the permissions separately for each folder. Your delegate, for example, could have editor permission on your calendar, reviewer permission on your task list, and no access to your inbox. See the illustration.
Step 3. From the delegate’s workstation, to gain access to the boss’ calendar:
- Start Outlook, go to the File menu, choose Open Special Folder, and select Server Folder.
- Type a portion of the boss’ name, or choose it from the global address list by clicking the Name button.
- Choose the folder you want to open, such as Calendar. Click OK.
- The boss’ calendar will appear in a new window (if you are a delegate).
Note the checkbox above that says "Delegate receives copies of meeting-related messages sent to me." This means that your delegate will receive meeting invitations which were sent to you. Think about that before you make everyone in your group a delegate. A meeting request sent to one other person might get copied to everybody.
The delegates method described above enables you to select File, Open, Other Users Folder, from the menus and open another users folder in a separate window in Outlook and in Outlook Web Access. Only certain folders are available, such as the calendar, inbox, etc. If you need access to custom folders in the other users mailbox, you'll need to add the other users mailbox to your folder list. This allows you to view the other users entire folder tree, and access any and all folders in your main Outlook window -- if you have the right permissions of course. See the following section for how to manipulate those permissions.
Folder Permissions Method
Note for Mac users:
You must be a delegate of the other user in order to open any of their folders. The permissions changes described below are not enough by themselves, you must also be a delegate.
From the mailbox owner’s workstation...
Start Outlook, go to the View menu, and click Folder List, if necessary, so you can see the folder list.
In order to give your assistant permission to add your mailbox to a profile, right-click the top-level icon labeled “Mailbox – Your Name” and choose permissions. Click the Add button to add the assistant. Give the assistant the “Reviewer” role on the top-level mailbox folder.
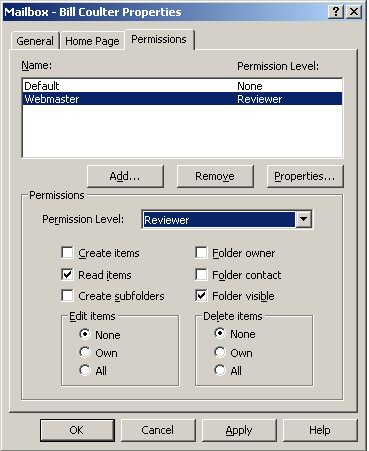
Right-click the folder you want to share, such as the Calendar, and choose Properties.
Choose the Permissions tab. The following dialog will appear.
Click the Add button, select the assistant’s name and choose the appropriate role, such as Editor.
Repeat this process for each folder you want to share.
From the assistant’s workstation...
To add the boss’ mailbox to your profile, you need to access the Advanced properties dialog shown below. This dialog is accessed slightly differently in each version of Outlook.
- Outlook 2013 & 2010
- Click File, Account Settings, Account Settings.
- Verify that the account you want to configure is selected and choose the Change button.
- Click the More Settings button.
- Click the Advanced tab.
- Outlook 2007
- Go to the Tools menu and choose Account Settings.
- Verify that Microsoft Exchange Server is selected in the list and click the Change button.
- Click the More Settings button.
- Click the Advanced tab.
The dialog will appear as below.
Click the Add button and type a portion of the boss’ name in the box. Click OK several times to return to Outlook. If you have the necessary permissions, the new mailbox will appear in your folder list, and you will be able to open some of the folders in it (depending on permissions).
Pros and Cons:
The Delegates feature is easier to set up, and easier to use. It summarizes all delegates and their permissions in one convenient dialog box. The delegates method gives you a separate window for each boss' calendar, which many people prefer.
The folder permissions method makes it possible for the assistant to add the boss’ entire mailbox structure with all its folders to his or her folder list, and access everything in one window, which many people prefer.
If you want to view folders other than the common inbox, calendar, etc, special folders set up for filing, then you need to use the folder permissions method.
Send As
If you are a delegate, one of the permissions you may have is to send messages on someone else's behalf.
Messages sent in this manner appear, for the most part, to have come from the person who delegated authority, not the person who sent the message. However, the message will actually say it is from "Jane Deaux on behalf of John Deaux." You may want to do some testing to see if this adequately misrepresents the actual sender of the message.
If you need the message to actually appear to come from the other user and not say 'on behalf of' please refer to our multiple identities page for more details.
To use the send-as feature, first you need to be a delegate with appropriate permissions. The details are above. Then here's the trick. Click the New Message button, and in the compose message form, click the View menu, and choose to view the "From field." Type the boss' name in the From field of the message send form. See the illustration.
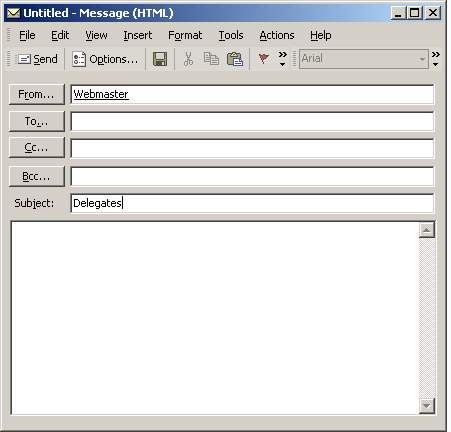
Note that you can not use the From field to send messages from another user unless you have been given Send As permission by the other user.